TableLayout(테이블 레이아웃)은 그리드 패턴으로 뷰를 배치합니다.
이는 동일한 크기로 여러 보기를 배치해야 할 때 유용할 수 있습니다. 다른 레이아웃 ViewGroup 상속과 달리 TableLayout 이 레이아웃은 LinearLayout에서 상속됩니다.
사용하는 방법
그리드의 가장 바깥쪽 가장자리 테이블 레이아웃 태그로 감싼다
테이블의 한 줄에 해당하는 행은 표행 태그로 감싼다
TableRow 안에 가로로 추가하고 싶은 뷰를 하나씩 추가할 수 있습니다. 이렇게 추가된 각 보기는 열 역할을 합니다.
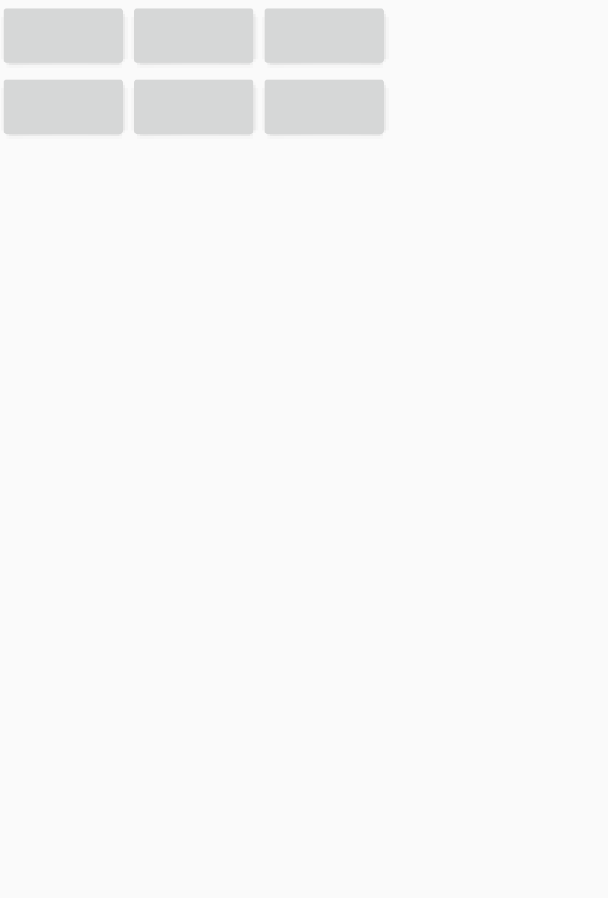
아래는 버튼을 3×2 크기로 배치하는 예제 코드입니다.
<?xml version="1.0" encoding="utf-8"?>
<TableLayout xmlns:android="http://schemas.android.com/apk/res/android"
    android:layout_width="match_parent"
    android:layout_height="wrap_content">

    <TableRow>

        <Button
            android:layout_width="wrap_content"
            android:layout_height="wrap_content" />

        <Button
            android:layout_width="wrap_content"
            android:layout_height="wrap_content" />

        <Button
            android:layout_width="wrap_content"
            android:layout_height="wrap_content" />

    </TableRow>

</TableLayout>
3개의 열이 있는 2개의 행이 있음을 알 수 있습니다.
다음은 테이블 레이아웃에서 일반적으로 사용되는 세 가지 속성입니다.
stretchColumns
위의 코드에서 뷰는 테이블 형태로 배치되었지만 행에 공간이 남아 있습니다.
여유 공간이 없도록 보기를 배치합니다.원한다면 stretchColumn 속성 사용
속성 내에서 크기를 늘리려는 뷰의 인덱스를 작성합니다. 인덱스는 왼쪽부터 0부터 시작하여 columnd가 추가될 때마다 1씩 증가합니다. 여러 인덱스를 지정하려는 경우 , 기호로 연결
<?xml version="1.0" encoding="utf-8"?>
<TableLayout xmlns:android="http://schemas.android.com/apk/res/android"
    android:layout_width="match_parent"
    android:layout_height="wrap_content"
    android:stretchColumns="0, 1, 2">

    <TableRow>

        <Button
            android:layout_width="0dp"
            android:layout_height="wrap_content" />

        <Button
            android:layout_width="0dp"
            android:layout_height="wrap_content" />

        <Button
            android:layout_width="0dp"
            android:layout_height="wrap_content" />

    </TableRow>

</TableLayout>
stretchColumn으로 지정된 0번째, 1번째 및 2번째 열의 길이를 늘립니다.

선택되지 않은 컬럼은 원래 설정된 크기만큼의 공간을 차지하고 나머지 여유 공간은 모두 stretchColumn으로 지정된 컬럼이 차지합니다. 1, 2 다음과 같이 특정 열을 직접 지정할 수 있습니다. * 기호로도 표현할 수 있습니다.
layout_span
layout_span을 사용하면 칼럼이 지정한 값만큼 공간을 차지한다.
layout_span=”2″를 적용하면 이전에 1의 공간을 차지했던 뷰가 2의 공간을 차지합니다.
layout_column
layot_column에 인덱스 번호를 입력하면 지정된 인덱스 위치로 칼럼이 이동한다.
즉, 행 내에서 열의 위치를 직접 지정할 때 사용하는 속성입니다. stretchColumns와 마찬가지로 인덱스는 0부터 시작합니다.
행에서 세 번째로 배치되고 인덱스가 2인 뷰에서 layout_column=”3″이 적용되면 오른쪽으로 한 열 이동합니다.
<?xml version="1.0" encoding="utf-8"?>
<TableLayout xmlns:android="http://schemas.android.com/apk/res/android"
android:layout_width="match_parent"
android:layout_height="wrap_content"
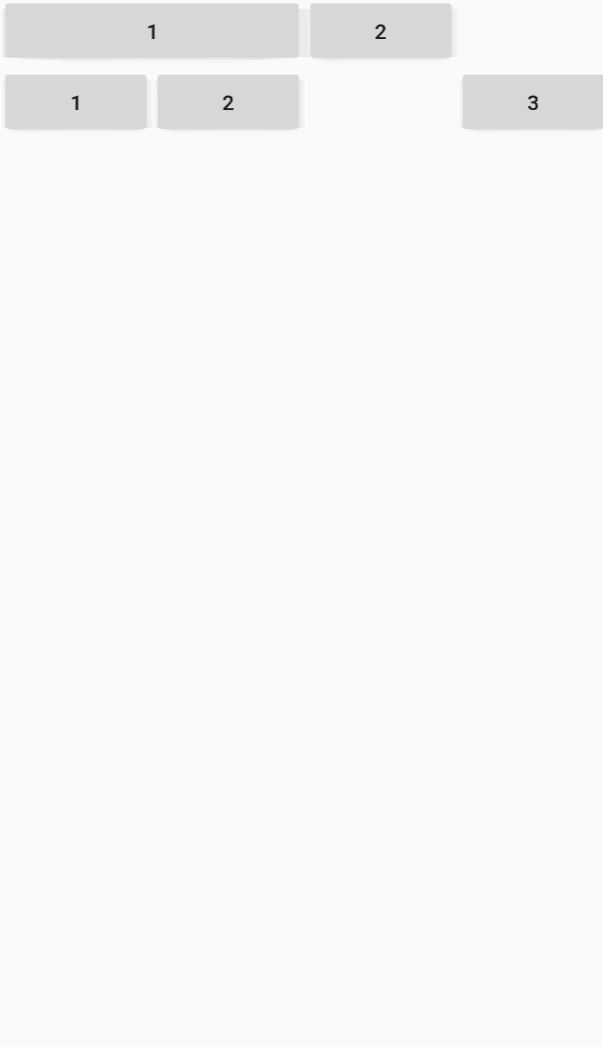
android:stretchColumns="*">
<TableRow>
<Button
android:layout_width="0dp"
android:layout_height="wrap_content"
android:layout_span="2"
android:text="1" />
<Button
android:layout_width="0dp"
android:layout_height="wrap_content"
android:text="2" />
</TableRow>
<TableRow>
<Button
android:layout_width="0dp"
android:layout_height="wrap_content"
android:text="1" />
<Button
android:layout_width="0dp"
android:layout_height="wrap_content"
android:text="2" />
<Button
android:layout_width="0dp"
android:layout_height="wrap_content"
android:layout_column="3"
android:text="3" />
</TableRow>
</TableLayout>행 1에서 버튼 1은 버튼 2만큼의 공간을 차지하며,
2열에서 3번 버튼은 인덱스 2의 자리를 건너뛰고 바로 인덱스 3의 자리에 위치합니다.
원천 : https://zion830.14
(안드로이드) TableLayout 사용
TableLayout(테이블 레이아웃)은 그리드 패턴으로 뷰를 배치합니다. 이는 동일한 크기로 여러 보기를 배치해야 할 때 유용할 수 있습니다. ViewGroup에서 상속받은 다른 레이아웃과 달리 TableLayout은 L
zion830.tistory.com